Synopsis / Summary
RNA-seq is a widely used method for interrogating the transcriptome of samples. Often RNA-seq experiments involve a collection of samples under different conditions such that the expression levels of the samples can be compared and the genes that are differentially expressed between these conditions can be identified. This document walks users through the process of analyzing such a differential expression experiment in the Galaxy Pro framework using either the 2 Sample RNA-seq Differential Expression Workflow - Paired-End or 2 Sample RNA-seq Differential Expression Workflow - Single-End Pro Workflows.
First, RNA-seq reads are run through fastp [1], a quality control tool. This tool optionally trims adapters and produces a report that summarizes statistics of the reads, including quality statistics, estimated insert size (for paired-end samples), k-mer biases, etc.
Each replicate of each sample is then analyzed to produce quantitative estimates of transcript abundances using the RNA-seq quantification tool Salmon [2]. Transcript abundances from this tool are reported as Transcripts Per Million (TPM), a normalized metric that accounts for transcript length and depth of sequencing, as well as raw count values.
These count values are then fed into DESeq2 [3], a differential expression analysis tool that compares expression levels between samples in different conditions to determine which genes are differentially expressed between these conditions.
Finally, the differential expression tables generated by DESeq2 are used to generate both a filtered differential expression table of only significantly differentially expressed genes, and a volcano plot illustrating the log Fold change and multiple testing corrected p values between the two samples for each gene.
Inputs & Outputs
Required Input Files:
- FASTA of reference transcriptome
2, Collection of FASTQ/A of sample 1, demultiplexed (at least 2 replicates) (either a Single-end or Paired-end sequence collection) 3. Collection of FASTQ/A of sample 2, demultiplexed (at least 2 replicates) (Single-end or Paired-end sequence collection) 4. GTF / GFF3 of annotated reference transcriptome
Optional Input Files:
- Adapter sequences for reads (if adapters are not already trimmed or unless you wish to attempt to autodetect adapters)
Output Files:
- QC reports from fastp and FastQC aggregated by MultiQC
- TPM Count Tables at both the gene and transcript levels
- DESeq2 Summary Figures / Reports
- DESeq2 Result Table
- Filtered DESeq2 Result Table
- Volcano Plot
Workflow
Step 1 - Input data
To begin the RNA-Seq analysis, the input files need to be loaded into GalaxyPro. The necessary files include: data files(*.fasta or .fastq), reference file (.fasta), a mapping of the transcripts to genes for the reference (gtf/gff format), and a metadata table. There are two methods to load data into GalaxyPro: data upload for files that are stored locally (typically your data and metadata table), or to copy files from a public database (typically reference files).
Sequencing data - FASTQ/A files
Option 1.1 - Data Uploaded from Your Computer
Uploading/Copying data
Uploading local files
To upload data from your local machine, click on the Get Data tool group and select the Upload file tool. This will open a floating window. In this new window, click Choose local files and select the files you wish to upload. You can select a genome build and data type for each dataset, but this is not neccesary.
Copying from another history
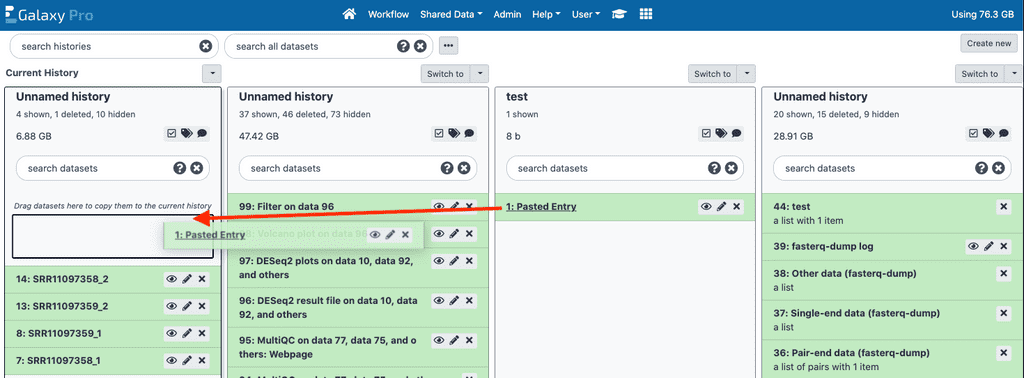
Alternatively, you can copy files from another history. Click on the small two-column icon in the upper right of the screen. This will open the histories page. You should see all of your histories. To copy data from another history, simply drag the dataset by its name to the history you want to use it in. Then simply click the house icon to return to the tools and history view.
Formatting data into collections
To analyze RNA-seq data using the two sample workflow, replicates of the same experimental conditions must be grouped together into a collection in the Galaxy Pro interface. If you upload data directly, you will need to generate such collections through Galaxy Pro.
Single-end data
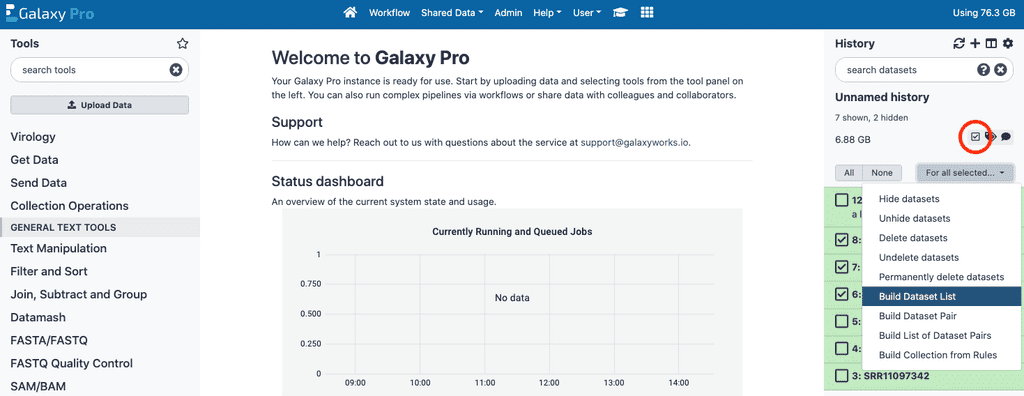
To do this for single-ended data we will make use of the Operations on multiple datasets button on the right panel of Galaxy Pro (circled in red).
Click this button, which will add checkboxes next to each file in the Galaxy Pro right panel. Select all the files for the first condition to be included in this analysis, then click the For all selected button, and select the Build Dataset List option. This will open a panel, where you can name this new collection, and review that the files being included in the collection are the correct files. Once you have done this, click the Create List button. Once this collection / list is generated, unselect the datasets for the first condition and repeat this process for the second condition.
Paired-end data
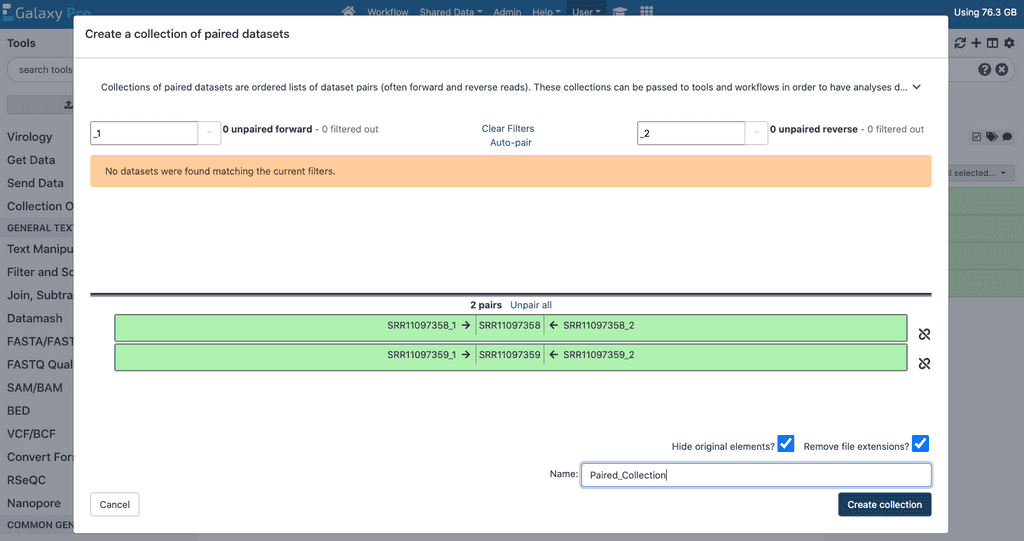
To create a collection for paired end data we will also make use of the Operations on multiple datasets button on the right panel of GalaxyPro. Click this button and select all the files to be included in this analysis including both read 1 and read 2 files for each replicate for the first sample to be analyzed. Then, click the For all selected button, and select the Build List of Dataset Pairs option.
This will open a panel in which the files corresponding to read 1 and read 2 for each replicate can be grouped together. If your files are named such that the paired read file names are identical except for ‘_1’ and ‘_2’ suffixes, the Auto-pair button in this menu should work to pair these datasets correctly. Double check that all the files are paired with their appropriate paired files. Once all your paired end reads are grouped properly for your first sample, click the Create List button to generate a paired collection. Then, unselect all the data corresponding to the first sample, and repeat the process for the data corresponding to the second sample.
Option 1.2 - Data Download from NCBI SRA
If your data has previously been uploaded to SRA, you can upload a list of accessions and download them to GalaxyPro in bulk directly from SRA. To do this you will first need to, in a text editor on your computer, create a list of SRA accessions that belong in the collection corresponding to the first sample collection with one accession number per line of each file and upload this file to GalaxyPro using the upload protocol described above. Once the SRA accession list is uploaded, we’ll use the Faster Download and Extract Reads In FASTQ tool on the left tool list under the Get Data subsection.
From there, click select input type, the first element on the tool page and set it to List of SRA Accession, one per line. This will then allow you to select the SRA accession lists you uploaded to GalaxyPro in the sra accession list field. Once you’ve selected one of the files you uploaded, click the execute button on the bottom of the page to begin download of the SRA files for that list. The files for each SRA accession list uploaded will automatically be grouped in a collection. You can then rename the output collection if desired.
Once done with this process for the accessions for the first sample, repeat this process for the accessions for the second sample.
Step 2- Running the workflow - Quality Control & adapter trimming (optional) via fastp, quantification via Salmon, and differential expression via DESeq2
Selecting a workflow
The next step in RNA-seq analysis will be running the full workflow. There are two workflows that can be used, one to be used in the event your data is single-end and one for if your data is paired-end.
First find the correct workflow depending on if you have single-end or paired-end reads. Public workflows can be found in the Shared Data > Workflows section of GalaxyPro by searching for it.
Running a workflow
Once you’ve found the correct workflow, click the drop down arrow to the right of the workflow name and select “Run”. You will then be prompted to select datasets for each of the components of the workflow.
The following inputs should be present:
- History Options: Send results to a new history - default is set to no. The results files will be written in the same history as the input files. Change to yes if you want the results files saved in a new history.
- Disable Adapter Trimming: default is set to NO - the sequences will not have the adapters trimmed. Set to YES if adapters need to be trimmed from these reads.
- Adapter sequence for reads input 1 - The adapter sequence to trim from the input 1 reads in a paired end experiment, or the inputs in a single end experiment. If this input is left blank, fastp will attempt to auto-detect the adapter sequences for each input reads and trim this auto-detected sequence. Ignored if Disable Adapter Trimming is set to Yes.
- Adapter sequence for reads input 2 (paired end only) - The adapter sequence to trim from the input 2 reads in a paired end experiment. Ignored if Disable Adapter Trimming is set to Yes
- Sample 1 Replicates: select the file collection for sample 1.
- Sample 2 Replicates: select the file collection for sample 2.
- Reference Transcriptome (FASTA): using the dropdown menu, select the nucleotide sequences of the reference transcriptome in FASTA format to use in quantification steps.
- Reference Transcriptome (GTF/GFF3): File containing mapping of transcripts to genes (GTF/GFF) - select the correct file using the dropdown menu for the reference transcriptome annotation, in GTF or GFF format, used to map transcript IDs to gene IDs in quantification steps.
- Strandedness of input reads: The strand relative to the transcript sequences (in the FASTA file) on which the RNA-seq reads originated from. I.e. whether the reads are sense relative to the transcript sequence (Read comes from the forward strand (SF)), antisense relative to the transcript sequence (Read comes from the reverse strand (SR)), or are Not stranded (U). If you are unsure what strand your reads are, check with the person who prepared your sequencing library.
- Sample 1 Label: A sample name for the first sample.
- Sample 2 Label: A sample name for the second sample. Cannot be the same name as Sample Label 1
- Differential Expression Factor: The factor that differs between the two samples, e.g. genotype, drug_x, cancer_markers, etc. Only letters, numbers and underscores will be retained in this field. Defaults to DiffExprFactor.
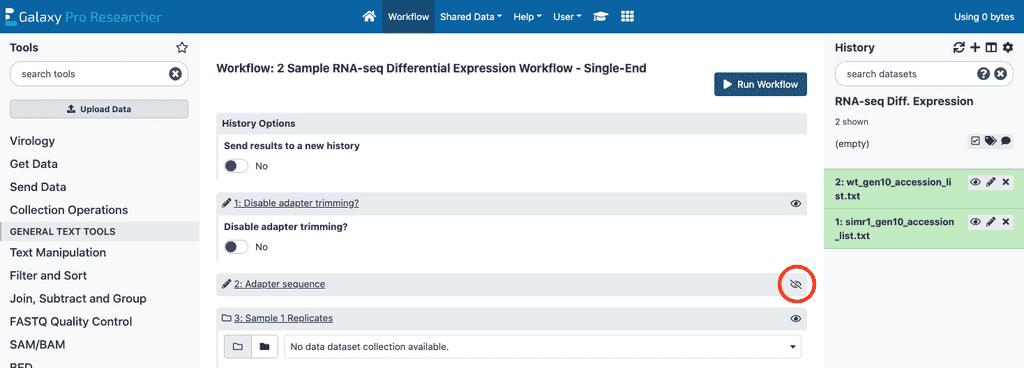
The remaining steps used in the data analysis have had their default parameters optimized and do not require any modification to run the workflow. Advanced users may access the details for each of these steps by clicking on the crossed out eye (circled in red in above screenshot) and change parameters if desired.
- Fastp, Salmon quant, and DESeq2 - are all tools used in the data analysis that have had their default parameters optimized. For standard sample types, no changes are needed. Advanced users may click on these tools and change parameters if desired.
- Volcano plot: Plot options can be accessed if default options are not applicable.
- Filter: Filtering options can be accessed if default options are not applicable.
- Select the appropriate datasets or values for each of these inputs, then click the
Run Workflowbutton to begin this analysis step.
When completed, the workflow will have generated HTML reports from fastp summarizing read QC metrics for each input, a collection of count tables for each sample, a differential expression table for the comparison between samples, a series of plots produced by DESeq2 for visualizing the comparisons between samples, a volcano plot of Log2FC vs significance for the comparison between samples, and a filtered differential expression table that only reports genes with significant differential expression after multiple testing correction between the two samples as determined by the threshold for significance specified in the input parameters (defaults to 0.05).
All of these are compiled into a single report that can be explored or downloaded. To access this report, as well as information about any workflow you have run, click on the User dropdown menu and select Workflow Invocations. You will see all of the workflows you have run. Click on the name of the workflow you want to examine. Additional information about that run of the workflow will appear beneath the entry including the workflow report and information about all datasets involved in the run.

Running the workflow: example
This example will be demonstrated by running the "2 Sample RNA-seq Differential Expression" workflow with a dataset from NCBI SRA, that sequenced wild-type and simr-1 mutants of C. elegans at several generational timepoints [1].
Step 1 -
There are two options:
- Download a complete dataset, giving you familiarity with loading data.
- Use provided example data which is small and will run faster and give you experience with data libraries.
Option 1: Data upload / download
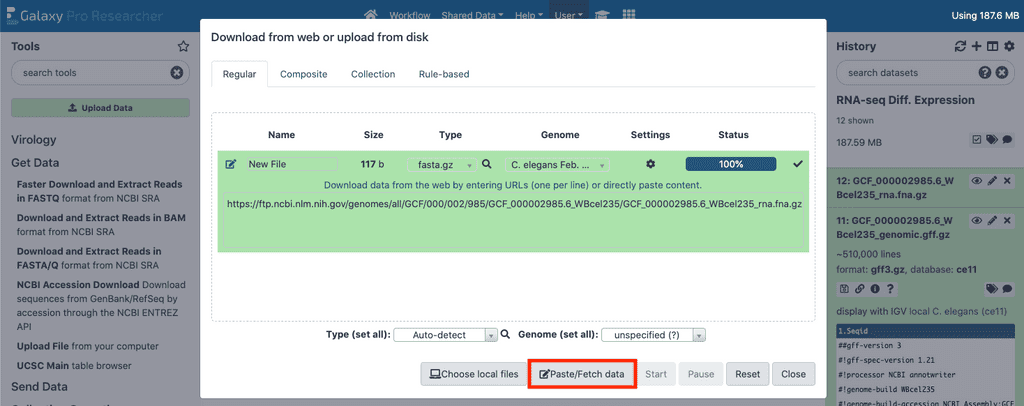
You will begin by downloading four files using Step 1.2 in the instructions above. In this example you will be using the data at 10 generations for both the wild-type and simr-1 mutant. To create the accession lists, select the tool group Get Data and select Upload File. Click the Paste/Fetch data button, name the file "wt_generation10_accession_list" and paste the following lines into the text field and the press Start:
SRR11097342
SRR11097343
SRR11097344
Repeat the process to create a dataset called "simr_generation10_accession_list" and paste these lines into the new text field:
SRR11097345
SRR11097346
SRR11097347
To download data from SRA, you run the tool Faster Download and Extract Reads in FASTQ.
- Select this tool in the tool panel on the left.
- Change
select input typetoList of SRA accession, one per line, and setaccession_listto the file "wt_generation10_accession_list". - Then click
Execute, to begin the download process.
The example experiment uses single-end reads, but the download tool generates four separate history entries: one collection labeled “Pair-end data (fasterq-dump)”, which in this example will be an empty collection; one collection labeled “Single-end data (fasterq-dump)” which should contain 3 files when the tool is done running; one collection labeled “Other data (fasterq-dump)” which in this case will be an empty collection; and a log file labeled “fasterq-dump log”.
When the tool is done running, check the “fasterq-dump log” file to ensure that there were no error messages or warning messages about the download. If the log is free of warnings or errors then you’re ready to move on.
Now click on the collection labeled “Single-end data (fasterq-dump)”. This should expand to a collection with three files in it. Click the title of the collection, and rename it wt_generation10_samples.
Repeat this process for the accession list for the second sample, labeled "simr1_generation10_accession_list". For this sample, name the output collection "simr1_generation10_samples".
In addition to the data files, you will also need a C. elegans transcriptome annotations in FASTA format, as well as a GTF / GFF3 file that allows you to relate the transcript names in the FASTA file to their corresponding genes. To import these files into Galaxy directly from NCBI:
- Go to
Upload Filein theGet Datagroup of tools. - Select the
Paste/Fetch databutton, and paste https://ftp.ncbi.nlm.nih.gov/genomes/all/GCF/000/002/985/GCF_000002985.6_WBcel235/GCF_000002985.6_WBcel235_genomic.gff.gz. - Then, set the file type to gff3 and give it the filename “ce11 GFF3 Annotation” (without the quotes), and start the download.
Once this file is downloaded, it needs to be uncompressed. To do this:
- Click on the annotation dataset.
- Next click the small pencil icon to open up the “Edit datasets attributes” page in the center pane.
- Click on the
Converttab. - Select
Convert compressed file to uncompressedand clickConvert dataset. This will generate an uncompressed GFF3 annotation to use in the workflow. - Repeat this process to download the FASTA reference file by pasting the link https://ftp.ncbi.nlm.nih.gov/genomes/all/GCF/000/002/985/GCF_000002985.6_WBcel235/GCF_000002985.6_WBcel235_rna.fna.gz and using the filetype fasta.gz and the filename “ce11 FASTA Annotation” (without the quotes). This file does not need to be uncompressed.
Once all your data is uploaded, you’re ready to move on to step 2.
Option 2: Get data from a data library
The example data consists of the same datasets described in option 1 but restricted to chromsome I.
- First, click on the
Shared Datadropdown menu and selectData Libraries. You will be brought to a page containing all of the data libraries available. - You want to select
Example Databy clicking on the name and then2 Sample RNA-seq Data. - You will need all of the datasets in the folder so you can click on the empty box in the list header (to the left of "Name"). This will select all of the datasets, shown by a check mark appearing next to each.
- At the top of of the window, click
Export to Historyto see the drop-down menu and selectDatasets. - You should now see a floating window allowing us to import to a specific history or create a new history. Name a new history and click
Import. - Finally, you can click on the house icon in the masthead to return to the Galaxy home screen. You should see that your newly-made history is active.
Once you verify that you have two annotation files (one GFF3 and one FASTA) and two lists containing three FASTQ samples each, you're ready to move on to step 2.
Step 2 - Running the workflow
The “2 Sample RNA-seq Differential Expression” workflow combines the steps of quality control, adapter trimming, quantification, and differential expression analysis. To access this workflow:
-
Click on the
Shared Datadropdown menu at the top of the GalaxyPro page and selectWorkflows. -
Next, search for
2 Sample RNA-seq Differential Expression Workflow - Single-End. If you are running your own data and that data is paired-end and in a paired end collection, search instead for2 Sample RNA-seq Differential Expression Workflow - Paired-End. -
Click on the gray drop down arrow on the appropriate workflow owned by pro@galaxyworks.io and select
Run.The following information should be input into the workflow fields:
- For the
1. Reference Transcriptome FASTAfield, select “ce11 FASTA Annotation uncompressed”. - For “Reference transcriptome (GTF / GFF)” select “ce11 GFF3 Annotation uncompressed”
- First, set
Disable adapter trimmingto “No”. Next, expand the section for “Adapter sequence for input 1”. It should be blank (If left blank fastp will attempt to auto-detect the adapters used and trim those adapters). For your own data, you may wish to disable adapter trimming if it has already been performed. If it has not been performed, and you know the adapter sequence used, be sure to add the adapter sequence to the “Adapter sequence for input 1 field”, as this will often improve the quality of adapter trimming. - For “Sample 1 replicates”, select the first collection of FASTQ files you downloaded, corresponding to wt-samples.
- For “Sample 2 replicates” select the second collection of FASTQ files you downloaded, corresponding to simr-1 samples.
- For “Strandedness of the reads”, set it to Not Stranded (U) .
- For Sample 1 label, input “wt”
- For Sample 2 label, input “simr1”
- And for Differential Expression Factor input “Genotype”
- Then, click Run Workflow in the top right of the middle panel.
- For the
This will take some time to run, and should result in a set of QC reports of the reads, a collection of counts tables, a full differential expression table, a filtered differential expression table, and a volcano plot.
References
-
Chen S, Zhou Y, Chen Y, Gu J (2018). "fastp: an ultra-fast all-in-one FASTQ preprocessor." Bioinformatics, 34(17), i884–i890. https://doi.org/10.1093/bioinformatics/bty560.
-
Love MI, Huber W, Anders S (2014). “Moderated estimation of fold change and dispersion for RNA-seq data with DESeq2.” Genome Biology, 15, 550. https://doi.org/10.1186/s13059-014-0550-8.
-
Patro R, Duggal G, Love MI, Irizarry RA, Kingsford C (2017). "Salmon provides fast and bias-aware quantification of transcript expression." Nature Methods, 14(4), 417–419. https://doi.org/10.1038/nmeth.4197.
-
Manage KI, Rogers AK, Wallis DC, Uebel CJ, Anderson DC, Nguyen DAH, Arca K, Brown KC, Cordeiro Rodrigues RJ, de Albuquerque BF, et al. (2020). "A tudor domain protein, SIMR-1, promotes siRNA production at piRNA-targeted mRNAs in C. elegans." Elife 9. http://dx.doi.org/10.7554/eLife.56731.

